
Quote of the Day
There are no secrets to success. It is the result of preparation, hard work and learning from failure.
— Colin Powell, general and statesman.
Introduction

Figure 1: Radius Measurement Example Using Two Gage Rollers and a Surface Plate.
This post will demonstrate how to measure the radius of an arc using two roller gages. While I am a very amateur machinist, I have on occasion needed to measure the radius of an arc (i.e. partial circle) and have not been sure how to approach that measurement. It turns out to be simple given two equal diameter roller gages and a surface plate. You can determine by taking one measurement and knowing the roller gage diameter.
Background
I have been reading this web page on metrology, and this post consists of my notes from reading this web page. The key formula for measuring the radius of curvature for an arc is given by Equation 1.
| Eq. 1 | 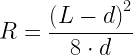 |
where (referring to Figure 2).
- R is the radius of the arc we want to measure.
- d is the diameter of the two roller gages – they must be equal diameter.
- L is the distance between the two roller gages as measured from their points of maximum separation.
Analysis
Derivation Geometry
The geometric situation is simple and illustrated in Figure 2. The radius of the yellow circle (R) is what needs to be measured. Note that we do not need a full-circle to apply this method – we can work with an arc. The only direct measurement I need to make is of L.

Figure 2: Radius Measurement Using Gage Rollers Scenario.
Derivation and Example
Figure 3 shows the derivation, which consists of applying the Pythagorean theorem and simplifying. I also include my calculations for the example of Figure 1. The mathematical result equaled the value on my scale drawing (Figure 1).

Figure 3: Proof and Worked Example Using the configuration in Figure 1.
Conclusion
I have struggled to measure the radii of various partially circular objects like bowls. Using a couple of roller gages gives me a simple way to measure the radius of curvature for these partial circles.
You tried to measure the radius of your bowels?
Just a typo I know, but, you may be able to correct it in the online version.
This is a funny typo! I meant bowl. Thank you for the help.
mark
Pingback: Another Angle Measurement Using Roller Gages Plus Error Analysis Example | Math Encounters Blog