Australian Phone Line Impedance Math

Quote of the Day

The time to reef the sails is before the storm is upon you.

— Old sailing aphorism


Introduction

I am doing some work with international phone circuits and I noticed that the Australian government has test procedures that model the characteristic impedance of the phone line using a resistor/capacitor circuit (see Figure 1). In the US, we model the nominal cable characteristic impedance using a 600 Ω resistor (thick outside plant wiring) or 900 Ω resistor (thinner central office wiring). I thought I would take a quick look at how the Australian load circuit compares to the standard formula-based model used for the characteristic impedance of a wire pair. For testing, we like to use lumped component models of phone wire rather than using long runs of wire pairs -- it is a matter of cost and convenience.

Background

I have discussed modeling the characteristic impedance of a phone line in this post and that presentation is also true for Australia.

Analysis

Circuit

I obtained the Australian phone impedance information from this document. Figure 1 shows the equivalent circuit I will be analyzing.

Figure 1: Equivalent Load Circuit For Australian Phone.

Figure 1: Equivalent Load Circuit For Australian Phone.

Modeling

Figure 2 shows my circuit analysis results. The characteristic equation is discussed thoroughly in his Wikipedia entry. Appendices A and B discuss my sources for cable information and cable dimensioning.

Figure 2: Characteristic Impedance and Lumped Impedance Circuit Analysis.

Figure 2: Characteristic Impedance and Lumped Impedance Circuit Analysis.

Graph

Figure 3 shows my graph of the characteristic impedance formula and the lumped circuit input impedance over a frequency range of from 1 kHz to 4 kHz (normal voice range).

Figure 3: Impedance Versus Frequency (1 kHz to 4 kHz).

Figure 3: Impedance Versus Frequency (1 kHz to 4 kHz).

Conclusion

I can see that the Australian phone line impedance model is a reasonable approximation for 26 AWG wire over a ~1.7 kHz to 4 kHz frequency range. The US approach is to use a single 600 Ω resistor or 900 Ω resistor to model a phone line. This is a reasonable approach from an impedance magnitude standpoint, but it does not model the phase.

Appendix A: Australian Cable Characteristics

I used this blog post as my source of information on Australian telecom cabling. This quote was important to my analysis.

The reality is that little of Australia’s copper on the distribution side (what matters for FTTN) of the network is over the 0.64mm diameter cable (aka: 22 AWG) that VDSL2 requires, much of it is in the 0.40mm & below class, with some newer areas having 0.50mm deployed. The only places I’ve come across with 0.64mm & above cable are rural areas. Most of the 0.64mm & 0.90mm in the bush is long line PSTN with loading coils. Essentially the higher gauge was used to extend a phone line out to a farmstead or the like.

The cable specifications that I have seen look like American 26 AWG and 28 AWG cable. This is pretty fine wire -- in the US I normally find 24 AWG, some 22 AWG, and even some 19 AWG.

Appendix B: Defintion of Cable Terms

Here is a link to a good reference on transmission line parameters. Figure 4 shows the definitions of the cable parameters r and a.

Figure 4: Cable Dimensions.

Figure 4: Cable Dimensions.

Posted in Electronics | 3 Comments

The Old Two Coat Trick

Quote of the Day

Everything we call real is made up of things that cannot be real.

— Niels Bohr


I had a déjà vu moment this morning. One of my staff members was looking for another staff member and I heard him say "Al must still be here because his coat is in his cube". This statement brought back a few memories. As a management person, I occasionally have to deal with problem employees who do not show up for work. I once had an employee who had figured out that I determined if he was at work by looking in his cube for his coat. I ASSUMED that seeing his coat in his cube meant that he was at work somewhere, but I would never go looking around for him. Bad assumption -- he had two coats. He would wear one to and from work and would leave the other in his cube when he left work early. I eventually did figure out that he had two coats and I told him that I was on to his trick.

Because this employee was using "The Old Two Coat Trick", I started to check the parking lot to see if his car was in the lot. This worked for a while, but then I started to notice that his car was in the lot, but he was not at work. That was when I learned about "The Old Two Car Trick" ...

Posted in Management | 4 Comments

Two-Resistor Thermistor Linearizer

Quote of the Day

Ability is of little account without opportunity

— Napoleon Bonaparte


Introduction

I was asked a question today about how to design a two-resistor thermistor linearization circuit. This very brief post is intended to provide the background needed for this task.

Background

Scope

There are numerous ways that one can linearize a thermistor's temperature response. In this case, I put the thermistor into a voltage divider and select resistor values that will produce a transfer function with a zero second-derivative at a point I select. The zero-second derivative means that the curve is linear at the point I chose.This work is a straight-forward generalization of the one-resistor linearizer as covered in this blog post. I like this approach because:

  • I can select the point about which I have maximum linearity.

    My applications usually need high accuracy within a certain temperature range and less accuracy outside of this range. This approach allows me to move the temperature interval of maximum linearity to where I need it.

  • The approach is computationally simple.

    Two resistors values to compute -- two formulas. Doesn't get much simpler than that.

Compared to the one-resistor linearizer in this post, the two-resistor linearizer gives you wider dynamic range at the cost of lower sensitivity and adding another part. Like all engineering tradeoffs, you have to decide what you need.

Derivations

The derivations were a tad long and I used a computer algebra system to perform them (Mathcad). Appendix A contains the details. You will not see all the intermediate steps because Mathcad will perform many simplifications in each step.

Analysis

This is an arbitrary example I made up to illustrate the process.

Thermistor

Figure 1 shows a thermistor that I am familiar with and I will use in this example (datasheet).

Figure 1: Cantherm Thermistor Used For an Example.

Figure 1: Cantherm Themistor Used For an Example.

Circuit

Figure 2 shows the two-resistor linearizer. Nothing special here.

Figure 2: Two-Resistor Thermistor Linearizer.

Figure 2: Two-Resistor Thermistor Linearizer.

Equation Definitions

I will be linearizing the divider ratio of the thermistor with the two resistors. I will define this ratio as shown in Figure 3.

Figure 3: Some Equation Definitions.

Figure 3: Some Equation Definitions.

Modeling

Figure 4 shows how I modeled the problem mathematically. My basic approach was to:

  • Set the second-derivative of the gain curve to zero at a temperature I call the inflection temperature TI. The engineer can choose TI.
  • The engineer chooses the desired resistor ratio at TI, \mu =G\left( {{T}_{I}} \right). Not all ratios are possible for a given thermistor. Ratios less than \displaystyle {{\mu }_{Critical}}=\frac{\beta -2\cdot {{T}_{I}}}{2\cdot \beta } result in negative RP values.
  • μ is used to compute RS using the formula \displaystyle {{R}_{S}}={{R}_{T}}\left( {{T}_{I}} \right)\cdot \left( \frac{\beta -2\cdot T_I}{2\cdot \beta \cdot \left( 1-\mu \right)} \right).
  • Knowing RS allows me to compute RP using the formula \displaystyle {{R}_{P}}=\frac{{{R}_{S}}\cdot {{R}_{T}}\left( {{T}_{I}} \right)\cdot \left( \beta -2\cdot {{T}_{I}} \right)}{{{R}_{S}}\cdot \left( \beta +2\cdot {{T}_{I}} \right)-{{R}_{T}}\left( {{T}_{I}} \right)\cdot \left( \beta -2\cdot {{T}_{I}} \right)}.

This finishes the calculation. The raw Mathcad file can be obtained here. It is an XML file, so download it to your computer and read it into Mathcad. Your browser will just show you text. I have also included an Excel worksheet.

Figure 4: Modeling the Two-Resistor Linearizer.

Figure 4: Modeling the Two-Resistor Linearizer.

Graph Setup

Figure 5 shows how I setup my graph of the resistor divider output versus a straight line with the same slope at the temperature TI.

Figure 5: Graph Setup.

Figure 5: Graph Setup.

Graph

Figure 6 shows my graph of the thermistor's divider ratio and compares it to that of a straight line with the same slope as the resistor circuit at TI.

Figure 6: Graph of Actual Versus Ideal Linearized Thermistor Response

Figure 6: Graph of Actual Versus Ideal Linearized Thermistor Response

Conclusion

I wish I had more time to work on the discussion portion of this post. I am hoping the derivations presented are sufficiently detailed for folks to follow.

Appendix A: Derivation of RP and RS Formulas

Figure 7 shows my Mathcad derivation for the key formulas in this post. I am basically lazy and I let the software do all the simplification. I love math, but hate algebra.

Figure 7: Derivation of RS and RP Formulas.

Figure 7: Derivation of RS and RP Formulas.

Posted in Electronics | 3 Comments

Ballistic Coefficient Rule of Thumb Example

Quote of the Day

Wisdom and experience are built from bricks made from the mud of failure.

— Mike Blue


I am working on a ballistic simulator and I was looking for some test data. While hunting up some data, I stumbled upon a bullet/cartridge combination that almost exactly had the specific muzzle velocity that made the following "rule of thumb" true -- at least with respect to the Pejsa ballistic model (discussed here). I first discussed this "rule of thumb" in this post.

To a rough approximation, the BC [ballistic coefficient] can be estimated as the fraction of 1000 yards over which a projectile loses half of its initial kinetic energy. In other words, a bullet with a BC of 0.300 should lose roughly half of its initial kinetic energy at a range of 300 yards.

My analysis showed that the approximation should be exact for a bullet with a muzzle velocity of 3224 feet/sec. By exact, I mean that the bullet should have lost 50% of it energy by the time it reaches a range equal to the product of the ballistic coefficient and 1000 yards. It turns out the Weatherby .340 200 grain Hornady Soft Point has a velocity of 3221 feet/second (note that the ".340" is really a .338). So this would be a good test of the approximation. Figure 1 shows my data setup and Figure 2 shows my analysis and the results.

Figure 1: Ballistic Example Velocity Versus Range Table Setup.

Figure 1: Ballistic Example Velocity Versus Range Table Setup.

Book of Range Tables
Figure 2: “Rule of Thumb” Ballistic Coefficient Determination Example.

Figure 2: “Rule of Thumb” Ballistic Coefficient Determination Example.

My analysis shows that the approximation has less than a 3% error. This is well within the error that I expect for the ballistic coefficients and velocities listed in these tables (see this paper for an interesting discussion of these errors). So I consider this additional confirmation of my earlier result.

Posted in Ballistics | 4 Comments

World War 2 Submarine Hull Thickness Math

Quote of the Day

How are the children?

— Masai warrior greeting, intended to ensure that the warriors always keep their number one priority in mind.


I was reading a blog post on Gizmodo that did a bit of math to determine why a pipe breaks the way it does when the water inside freezes. As I looked at the post, I realized the math was the same as would be used to determine the hull thickness for a submarine rated to operate within a specified depth range. To verify my realization, I decided to do a bit of historical math and apply the formula to figuring out the hull thickness for a famous type of World War 2 submarines, the Balao Class Fleet Submarine (Figure 1).

Figure 1: Photograph of USS Balao.

Figure 1: Photograph of USS Balao.

The calculations are shown in Figure 2. The calculations agree with the pressure hull thickness actually used on this submarine. I have found a number of discussions on the Balao's operating depth (example). Richard O'Kane operated USS Tang down to 600 feet during sea trials. Apparently, the crews had great confidence in the construction of the Balao class.

Normally, I go through derivations of these equations. In this case, there are numerous discussions available on the web (e.g. here and here).

Figure 2: My Rough Analysis of the Required Steel Plate Thickness for a Balao-Class Submarine.

Figure 2: My Rough Analysis of the Required Steel Plate Thickness for a Balao-Class Submarine.

Wikipedia Post Design Margin Note Safety Margin for US Submarines O'Kane Reference Steel Yield Strength During WW2 Drawing of Balao Class Submarine O'Kane Biography Steel Yield Strength During WW2
Posted in Military History, Naval History | 2 Comments

An Example of Misusing Thermal Resistances

Quote of the Day

Being defeated is often a temporary condition. Giving up is what makes it permanent.

— Marilyn vos Savant


In my previous post, I provided some definitions of thermal resistances and thermal characteristics. In this post, I want to show the problem that got me interested in this subject. An engineer misused the numbers and got answers that did not make sense. I require the folks in my group to estimate the junction temperatures of the parts they use so that the know if there design may have a temperature problem. In this case, the calculation required the use of the ψJT thermal characteristic. The basic problem is straightforward:

  • Estimate the junction temperature of a part that dissipates 1.25 W.
  • We have a large number of thermal parameters available. Which one do we use?

Figure 1 shows how the calculation went.

Figure 1: Three Wacks at Estimating Junction Temperature.

Figure 1: Three Wacks at Estimating Junction Temperature.

I thought this was a good example to illustrate the importance of understanding the thermal parameters and using them properly.

As an aside, I also looked at estimating the ψJT using the estimating formula from the previous post (Figure 2).

Figure 2: Psi-JT Esimate with Comparison to the Measured Value.

Figure 2: Psi-JT Esimate with Comparison to the Measured Value.

The result is not too bad considering the limited data I have.

Posted in Electronics | Comments Off on An Example of Misusing Thermal Resistances

Compact Thermal Models for Electrical Components

Quote of the Day

The two things that make leaders stupid are envy and sex.

- Lyndon Johnson


Introduction

Figure 1: Example of a Compact Thermal Model.

Figure 1: Example of a Compact Thermal Model. (Source)

I am an electrical engineer and not a mechanical engineer, which means that if there was a choice of buying equipment parts on sites such as Octopart or calling in a professional, the first option may seem reasonable.
As such, I depend on electronic packaging professionals to provide me answers to my thermal questions at work. However, I am curious about how the packaging folks estimate the temperatures of my parts because it affects how my team designs products. This blog post documents my early self-education on how the thermal analysis of electronic components is performed. With a rounded understanding of thermal state change (materials changing from solids to liquids etc) we can better understand how different metals will perform as conductors. Their level of conductivity and energy lost through heat are important considerations before completing a deep thermal analysis of how electronic components perform. This blog post could help answer the question, What Are The Best Modern Wiring Materials? With their thermal thresholds taken into consideration, this post will provide insight into the most effective materials needed to efficiently work with electronic components. For all of your electrical product needs check out MOFSET.

After some explanatory setup, I will work through an interesting example that will estimate a thermal characteristic, known as ?JT, for a part based on its mechanical characteristics.

Background

Temperature Definitions

Note that when I refer to component temperatures, there are generally three temperatures that I worry about it: (1) ambient temperature, (2) junction temperature, and (3) case temperature. In practice, I tend to use ambient temperature and junction temperature the most. Case temperature is usually important when you have heat sinks attached to the component case. I am not allowed to use fans in my outdoor designs because fans are relatively unreliable and require maintenance (e.g. MTBF ? 10K hours under rugged conditions plus the need for regular filter changes). This means that my parts have to convectively cool themselves. I do use case temperature for certain indoor optical products, which often need heat sinks and forced air flow (i.e. fans).

Junction temperature
Junction temperature is the highest temperature of the actual semiconductor in an electronic device (Source).
Case temperature
The temperature of the outside of a semiconductor device's case. It is normally measured on the top of the case.
Ambient temperature
The temperature of the air that surrounds an electronic part. It often measured a defined distance away from a printed circuit board (e.g. 2 inches).

Why Do We Care About Component Junction Temperature?

There are four reasons why people care about the junction temperature of their semiconductors. Let's examine each of these reasons in detail.

Reason 1: Part Are Specified for Standard Ambient Operating Temperature Ranges

All parts have operating temperature limits and the part manufacturers will only stand by their parts if they are used at these ambient temperatures. The temperature limits are usually expressed in terms of one of the three standard ambient temperature operating ranges:

  • Commercial grade: 0 °C to 70 °C
  • Industrial grade: ?40 °C to 85 °C
  • Military grade: ?55 °C to 125 °C

Reason 2: Many Vendors Impose Special Component Temperature Limits

Many vendors impose a specific temperature limit on their semiconductor dice (e.g. the dreaded Xilinx 100 °C junction temperature limit). I have seen various junction temperature limits used: 110 °C, 120 °C, and 135 °C.

Reason 3: The Reliability of Components Varies with Temperature

The reliability of most electronic products is dominated by the reliability of the semiconductors in those products. Temperature is a key parameter affecting semiconductor reliability because many semiconductor failure modes are accelerated by higher temperatures. Semiconductor failure modes are tied to chemical reactions and the rate of a chemical reaction increases exponentially with temperature according to the Arrhenius equation. I have written about this dependence in a number of previous posts (e.g. here and here).

Reason 4: Company Standards and Practices

I frequently have had to conform to some government or corporate-imposed junction temperature limit. For example, Navy contracts set a junction temperature limit of 110 °C based on the reliability guidelines developed by Willis Willhouby. HP, Honeywell, and ATK all had similar temperature limits, but I cannot remember them all -- yes, I must be getting senile.

Types of Thermal Models

There are two common types of thermal models: detailed and compact. Detailed thermal models use mathematical representations of the objects under analysis that look very similar to the objects they represent. They usually use some form of finite element approach to generate their solutions. These software toys are expensive (e.g. Flotherm and Icepak). We use this type of model at my company ? very good and very expensive. Detailed thermal models are analogous to an electrical engineer's distributed parameter model.

Compact thermal models generally use some form of electrical component analog for thermal parameters. These electrical analogs do not look anything like the mechanical components they represent. Compact thermal models are not as accurate as a detailed thermal model, but they are computationally very efficient (i.e. fast) and the tools required are more readily available (e.g. spreadsheets, Mathcad, etc). Compact thermal models are analogous to an electrical engineer's lumped parameter model.

Thermal Resistances

The electrical engineering concepts of resistance, capacitance, and inductance are powerful in modeling because these components can be used as electrical analogs to anything that can modeled with a linear differential equation. The list of things that can be modeled with linear differential equations is long and important. For this post, we are only discussing thermal resistances. Circuits composed only of resistors do not have any variation with time. However, we can model thermal time variation by using capacitances and inductances. The following quote from the Wikipedia nicely states the thermal and electrical correspondences.

The heat flow can be modeled by analogy to an electrical circuit where heat flow is represented by current, temperatures are represented by voltages, heat sources are represented by constant current sources, absolute thermal resistances are represented by resistors and thermal capacitances by capacitors.

There are three thermal resistances that we encounter regularly: ?JA, ?JC, and ?JB. Let's discuss them in more detail.

?JA
?JA is the thermal resistance from the junction to the ambient environment, measured in units of °C/W. Ambient temperature plays the same role for a thermal engineer as ground does for an electrical engineer -- it is a reference level that is assumed to be fixed. Because ?JA depends on so many variables -- package, board construction, airflow, radiation -- it is measured on a JEDEC- specified, test PCB. ?JA may be the most misused of all the thermal parameter because people apply to it to PCBs that are completely different than the JEDEC test PCB. The only use for ?JA is for comparing the relative thermal merits of different packages, which is what JEDEC states in the following quote.

The intent of Theta-JA measurements is solely for a thermal performance comparison of one package to another in a standardized environment. This methodology is not meant to and will not predict the performance of a package in an application-specific environment.

?JC
The junction-to-case thermal resistance measures the ability of a device to dissipate heat from the surface of the die to the top or bottom surface of the package (e.g. often labeled with names like ?JCtop or ?JCbot). It is most often used for packages used with external heat sinks and applies to situations where all or nearly all of the heat is dissipated through the surface in consideration. The test method for ?JC is the Top Cold Plate Method. In this test, the bottom of the printed circuit board is insulated and a fixed-temperature cold plate is clamped against the top of the component, forcing nearly all of the heat from the die through the top of the package (Figure 2).

Figure 1: Theta-JC Test Fixure.

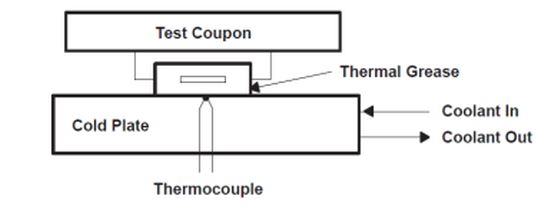
Figure 2: Theta-JC Test Fixture.

?JB
?JB is junction-to-board thermal resistance. From a measurement standpoint, ?JB is measured near pin 1 of the package (~ 1mm from the package edge) . ?JB is a function of both the package and the board because the heat must travel through the bottom of the package and through the board to the test point (Figure 3). The measurement requires a special test fixture that forces all the heat through the board (Source).

Figure 2: Theta-JB Test Fixture.

Figure 3: Theta-JB Test Fixture.

Thermal Characteristics

By analogy with an electrical resistor, the temperature drop across a thermal resistor is directly proportional to the heat flow through the thermal resistor. This not the case with the thermal characterization parameters. Because they are not resistor analogs, they cannot be used like a resistor for modeling purposes. However, they do allow an engineer to estimate the junction temperature of a component based on total power usage of a device, but only for the specific circuit conditions under which the parameter was determined.

Let's review the thermal characteristics in a bit more detail.

?JT
Junction-to-top thermal characteristic, is a measure of the junction temperature of a component as a function of the component top temperature, TT, and the power dissipated by the component, PComponent. ?JT is not a thermal resistance because its measurement includes thermal paths outside of the junction-to-board path. ?JT can be used to estimate junction temperature based on the equation {{T}_{J}}={{T}_{T}}+{{P}_{Component}}\cdot {{\psi }_{JT}}.
?JB
Junction-to-Board thermal characteristic, is a measure of the junction temperature of a component as a function of the board temperature below the component, TB , and the power dissipated by the component, PComponent. ?JB is not a thermal resistance because its measurement includes thermal paths outside of the junction-to-board path. ?JB can be used to estimate junction temperature based on the equation {{T}_{J}}={{T}_{B}}+{{P}_{Component}}\cdot {{\psi }_{JB}}.

Analysis

The following analysis will discuss an approximation for ?JT from Electronics Cooling Magazine, which did not include a derivation of the approximation. I include a derivation here. I also added an application example using three SSOPs and a chart that shows that the approximation works well for TQFP packages.

An Approximate Expression for ?JT

I find ?JT the most useful of the thermal parameters because it allows me to estimate junction temperature using the case temperature, which I can easily measure. However, most electronic component vendors do not specify ?JT. As I will show below, ?JT for molded plastic parts is closely related to ?JA, which is almost always specified. As I mentioned earlier, I do not find ?JA useful for estimating a part's junction temperature, but it is useful for comparing the relative thermal performance of different electronic packages.

Approximation Derivation

Equation 1 shows an approximation for ?JT that I find interesting and useful.

Eq. 1 {{\psi }_{JT}}=h\cdot \frac{{{\tau }_{EMC}}}{{{\kappa }_{EMC}}}\cdot {{\theta }_{JA}}

where

  • ?JT is the thermal characterization parameter for the junction to top-of-case temperature
  • h is the heat transfer coefficient for air under still conditions.
  • ?EMC is thickness of the Epoxy Molding Compound (EMC)
  • ?EMC is the thermal conductivity of the EMC.

Figure 4 shows my derivation of Equation 1, which I first saw in a couple of articles in Electronics Cooling Magazine.

Figure 3: Derivation of an Approximate Expression for Psi-JT.

Figure 4: Derivation of an Approximate Expression for Psi-JT.

Electronic Cooling Magazine Electronic Cooling Magazine Local Source Copy

Empirical Verification

I always like to look for empirical verification of any theoretical expression I deal with. There are a couple of ways I can verify the accuracy of this expression.

  • I can calculate estimates for ?JT using Equation 1 and compare my results to a measured value.

    This assumes that I can come up with accurate estimates for h, kEMC, and ?EMC.

  • Since ?JT is linear with respect to ?JA in the same package family, I can graph measured values for ?JT and ?JA and the plot should be linear.

    This assumes that h, kEMC, ?EMC are equal between all packages in the same family. This means that I can plot ?JT versus ?JA and I should get a straight line.

?JT Estimate Based on Mechanical Dimensions

Since TI has the best packaging data I can find, I will use Equation 1 to make a prediction of the ?JT for a TI package based on its material and mechanical properties. I have arbitrarily chosen an SSOP-type package for my example (Figure 5 shows the mechanical drawing).

Figure 4: Mechanical Drawing for TI SSOP Package.

Figure 5: Mechanical Drawing for TI SSOP Package.

I obtained the ?JT and ?JA from this document. I found values for h and ?EMC in an Electronics Cooling Magazine article. Assuming this information is correct, my calculations are shown in Figure 6. The results are reasonable given that we are using an approximation.

Figure 5: Comparison of Measured and Predicted Psi-JT's for SSOP Packages.

Figure 6: Comparison of Measured and Predicted Psi-JT's for SSOP Packages.

Graphical Look At The Relationship Between ?JT and ?JA

Table 1 shows data from this TI document on the thermal performance of their packages.

Table 1: List of TQFP ?JT and ?JA

Pkg Type

Pin Count

Pkg Designator

?JA

? JT

TQFP

128

PNP

48.39

0.248

TQFP

100

PZP

49.17

0.252

TQFP

64

PBP

52.21

0.267

TQFP

80

PFP

57.75

0.297

TQFP

64

PAP

75.83

0.347

TQFP

52

PGP

77.15

0.353

TQFP

48

PHP

108.71

0.511

Figure 7 shows a scatter chart of the data from Table 1. Note how the plot is quite linear with a slope of 0.004184, which means that ?JT is much smaller than ?JA.

Figure 5: Graph of Psi-JT Versus Theta-JA.

Figure 7: Graph of Psi-JT Versus Theta-JA a TQFP Family.

In Figure 8, I use Equation 1 to estimate what this slope should be by assuming all members of this packaging family have the same thickness of epoxy molding compound on top of the integrated circuit.

Figure 7: Estimating the Slope of the ?JT versus ?JA Line.

Figure 8: Estimating the Slope of the ?JT versus ?JA Line.

As we can see in Figure 8, Equation 1 provided a reasonable approximation for the slope of the line in Figure 7.

Conclusion

My goal was to learn a bit about compact thermal models and how they are used. This post provides the background information that I will need for some later posts on the subject. I was also able to confirm that an approximation for ?JT based on mechanical packaging information is probably a useful tool when useful vendor thermal specifications are missing – a distressingly common occurrence.

Posted in Electronics | 3 Comments

Difficulty of Viewing Dwarf Planets

Quote of the Day

Nothing can be of value without being an object of utility.

— Karl Marx


Introduction

Figure 1: Closeup of Pluto By New Horizons.

Figure 1: Closeup of Pluto By New Horizons spacecraft.

I was listening to an astronomer on the radio answering questions on viewing stars and planets. A question was asked about why we can have beautifully detailed photos taken from Earth of distant astronomical objects (e.g. Crab Nebula) but we cannot seem to obtain detailed photos of objects in our solar system like Pluto (Figure 1). The astronomer answered that the distant objects are huge and that we view them from Earth as having a larger viewing angle than a minor planet in our solar system. I thought it might be interesting to look at the relative viewing angle of these two objects when viewed from Earth.

Background

Example Images

Figures 2 and 3 show pictures of Pluto and the Crab Nebula. Notice how the picture of the Crab Nebula appears to be much more detailed than that of Pluto.


Figure 2: Pluto with Charon.

Figure 3: Crab Nebula

Some Definitions

Dwarf Planet
A celestial body in direct orbit of the Sun that is massive enough for its shape to be controlled by gravitation, but has not cleared its orbital region of other objects (Source).
Minor Planet
A minor planet is an astronomical object in direct orbit around the Sun that is neither a planet nor originally classified as a comet. Minor planets can be dwarf planets, asteroids, trojans, centaurs, Kuiper belt objects, and other trans-Neptunian objects (Source).
Planet
An astronomical object orbiting a star or stellar remnant that is massive enough to be rounded by its own gravity, is not massive enough to cause thermonuclear fusion, and has cleared its neighboring region of planetesimals (Source).
Viewing Angle
Angle of view describes the angular extent of a given scene that is imaged by a camera.

Visibility Criteria

I will compare the visibility of Pluto and the Crab Nebula by comparing their viewing angle from Earth. Let's define viewing as shown in Equation 1.

Eq. 1 \displaystyle \theta =\frac{d}{R}

where

  • R is the distance from Earth to the object being observed.
  • d is the distance across the object from the viewpoint of the Earth.

Analysis

Key Data

  • Pluto (Source)
    • Diameter: 2306 km
    • Distance: 39.4 AU

      Pluto's distance from both the Sun and the Earth varies all the time. For my rough analysis here, I will just use Pluto's mean distance from the Sun.

  • Crab Nebula (Source)
    • Diameter: 11 light-years
    • Distance: 6500 light-years

Calculations

Figure 4 shows my calculations of the viewing angles for Pluto and the Crab Nebula.

Figure 3: Viewing Angle Calculations.

Figure 4: Viewing Angle Calculations.

Conclusion

I had never thought about the difficulty of observing small objects in our solar system. I learned that those spectacular photographs we see from telescopes like the Hubble Space Telescope are of very large objects. Even with our largest instruments, the small, dark objects that occupy our solar system are very difficult to photograph in detail.

Posted in Astronomy | 1 Comment

My Borg Name is "1 of 13"

Quote of the Day

When I was 30, 35 years old, I knew, in a deep sense, every line of code I ever wrote. I’d write a program during the day, and at night I’d sit there and walk through it line by line and find bugs. I’d go back the next day and, sure enough, it would be wrong.

— Ken Thompson


Figure 1: Wikipedia Photo of "Seven of Nine".

Figure 1: Wikipedia Photo of "Seven of Nine". (Source)

I work for a small company that has 13 employees named "Mark", which is my first name. It is common for me to be in meetings with three "Marks" present. I have had as many as six "Marks" in a meeting. This makes using our first names difficult, and I usually go by my last name. This system works, but does sound a bit gruff to people from outside the company who here our meetings.

Most engineers are familiar with Star Trek and one of the managers at our company has proposed that we use the Borg naming convention for engineers named “Mark”. The Borg would give their individuals names like “Seven of Nine” (Figure 1).

The proposal at my company is to assign “Marks” their Borg name based on their placement in the company email list, which is alphabetical. Because I am the first "Mark" in the list, my Borg name is "1 of 13". The "Mark" sitting next to me is "9 of 13". The "Mark" a few cubes down from me is "13 of 13".

Not all Borg characters used this naming convention, like Locutus (Figure 1).

Figure 2: Wikipedia Photo of Locutus of Borg.

Figure 2: Wikipedia Photo of Locutus of Borg.

We do occasionally use these names in meetings, but just for fun. It is amazing that we have so many "Marks". However, we have quite a few engineers who are in the 50 to 60 year age group and "Mark" must have been a very popular name back in the 1950s.

Posted in Personal | Comments Off on My Borg Name is "1 of 13"

T-Shirt and Cotton Fiber Math

Quote of the Day

Do something instead of killing time. Because time is killing you.

— Paulo Coelho


Introduction

I was listening to a radio program called Planet Money today that was discussing how how intricate the infrastructure is for making something as simple as a T-shirt. They were making a T-shirt that they would sell to raise money to help the garment workers in Bangladesh (see Figure 1). The money required for this effort was raised on Kickstarter.

Figure 1: Planet Money T-Shirt.

Figure 1: Planet Money T-Shirt.

Here are some basic facts presented presented during the presentation:

  • The cotton used to make the T-shirt comes from very high-tech farms in the United States.

    The farms were operated by a small number of workers who really were technicians that supervised the operation of large machines.

  • The best cotton must never be touched by human hands.

    The highly automated US farms are ideal for producing high quality cotton.

  • The cotton fabric was made into T-shirts by workers in Bangladesh.

    These are very low paid workers -- $80 per month.

  • The T-shirts are shipped around the world on container ships.

    The development of container ships has enabled the efficient shipping of all sorts of products around the world -- including T-shirts.

I found the information about cotton to be the most very interesting. Here is a video from the SmartPlanet web site on the cotton-portion of the story.

I know NOTHING about clothing and fabric. Let's see if I can use some math and a little information from the web to learn something about fabric and T-shirts.

Background

There were four key numbers that I need to know my analysis:

  • It takes 6 miles of cotton thread to make a T-shirt (Source).

    I have seen this number quoted from a number of sources, including the radio broadcast we are discussing here.

  • The density of cotton is 1.55 gm/cm3 (Source).

    I calculated the average of the minimum and maximum values listed.

  • Making a T-shirt requires about 1 square yard of material (Source).

    The pattern I am looking at uses 1.25 yards. I am assuming that there is some waste and the T-shirt ends up containing about 1 square yard of fabric.

  • A typical T-shirts weighs 6 ounces.

    I just put my T-shirt on a food scale. The T-shirt was a short sleeve, V-neck style.

Let's see what we can learn from these numbers.

Analysis

Thickness of the Thread

A Little History

I deal with glass fiber all today, which is very fine (~125 μm). I show a cross-section of optical fiber in Figure 2 (Source). Fortunately, I have all sorts of fancy instruments that allow me to measure tiny things.

Figure 2: Cross-Section of Optical Fiber.

Figure 2: Cross-Section of Optical Fiber.

This has not always been the case for people who work with fiber. With respect to textiles, people have been producing fabric for thousands of years, but they had no way to accurately measure the thickness of the tiny thread they were using. As people do, they developed a workable substitute metric. They simply would run off a specified length of thread and weigh it (or determine its mass). As long as the thread was constructed consistently, this weight (mass) would be proportional to the diameter of the fiber and could be used as a substitute for the diameter. The metric standard is mass in grams for 9000 meters of fiber, which is called the denier. The Imperial unit is called the yield and is expressed in term of yards of thread per pound. Note how the dimensions (mass, length) of yield are the inverse of those for denier.

Modeling Fiber As A Cylinder

If we model a thread as a cylinder, we can estimate the thickness of the thread to be 0.12 mm, as shown in Figure 3.

Figure 3: Estimating the Thickness of the T-Shirts Cotton Thread.

Figure 3: Estimating the Thickness of the T-Shirts Cotton Thread.

Threads thickness is not normally specified in terms of a linear dimension like centimeters, but instead in units of denier or yield. A simple unit conversion shows us that T-shirt fiber has a thickness of 158 denier (Equation 1).

Eq. 1 \displaystyle \frac{\text{6 oz}}{6\text{ mile}}\cdot \frac{1\text{ mi}}{1609.3\text{ m}}\cdot \frac{28.3\text{ gm}}{\text{oz}}\cdot \frac{9000}{9000}=158.5\cdot \frac{\text{ gm}}{9000\ \text{m}}=158.5\ \text{denier}

On a related note, one can convert from a thread thickness specified in denier to centimeters. The Wikipedia give Equation 2 for performing the conversion.

Eq. 2 \displaystyle \varnothing =\sqrt{\frac{4.444\times {{10}^{-6}}\cdot \text{d}}{\pi \rho }}

where

  • \varnothing is the diameter of the thread [cm].
  • \rho is the density of the fiber material [gm/cm3].
  • d is the thickness of the fiber expressed in denier [gm/9000 m].

I derive this formula in the Appendix.

Thread Count of the T-Shirt Fabric

The thread count of fabric is defined as:

Thread count or threads per inch (TPI) is a measure of the coarseness or fineness of fabric. It is measured by counting the number of threads contained in one square inch of fabric, including both the length (warp) and width (weft) threads.

Figure 4 shows how I can estimate the number of threads per inch of T-shirt fabric.

Figure 4: Estimate of the Threads Per Inch for a T-Shirt.

Figure 4: Estimate of the Threads Per Inch for a T-Shirt.

The Wikipedia says that "standard" cotton fabric has a thread count of 150 threads per inch. So the number I came up with here is reasonable.

Conclusion

Just a quick post showing how the fabric for a T-shirt is measured.

Appendix:Wikipedia Thread Thickness Formula Derivation

Figure 5 shows the derivation of Wikipedia's formula for converting denier to centimeters.

Figure 5: Derivation of Conversion Formula Between Denier and Centimeters.

Figure 5: Derivation of Conversion Formula Between Denier and Centimeters.

Posted in General Mathematics | 3 Comments