
Quote of the Day
The man who moves a mountain begins by carrying away small stones.
— Confucius. Whenever I think of moving mountains one rock at a time, I think of the Crazy Horse Memorial.
Introduction

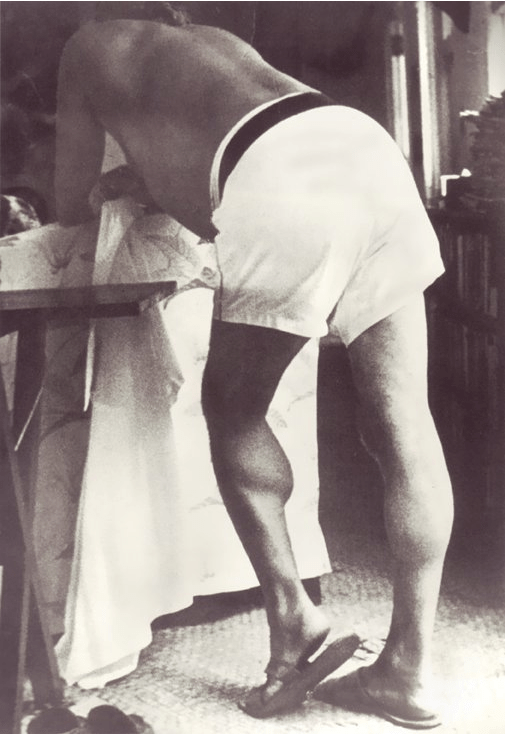
Figure 1: Telecommunications Outdoor
Electronics Temperature Stack Up.
I regularly receive questions on the handling requirements for Printed Circuit Boards (PCBs). In a previous blog post, I stated that I recommend that service personnel always wear gloves when handling outdoor electronics because electronics in an outdoor enclosure are required to function with an internal ambient temperature of 85 °C. The PCBs themselves usually operate a 10°C above the internal ambient temperature. So a maintenance technician could have to handle a PCB that is 95 °C (203 °F) – just short of the temperature of boiling water. I have measured PCB temperatures at Fort Mojave, AZ, and I can confirm the 95 °C value is real. Figure 1 illustrates how the temperature "stack up" works for a typical outdoor installation.
Today, I was asked "What is a reasonable maximum touch temperature for a consumer product's enclosure?" I thought I would do a quick survey of what the different industry standards recommend. I am looking for two things – a recognized industry standard with a measurable requirement.
Survey Results
OSHA
I did find a good forum discussion that mentions OSHA and gave a link to an interesting OSHA response on surface temperature requirements. I quote from this response below.
1910.132(a): Protective equipment, including personal protective equipment for eyes, face, head, and extremities, protective clothing, respiratory devices, and protective shields and barriers, shall be provided, used, and maintained in a sanitary and reliable condition wherever it is necessary by reason of hazards of processes or environment, chemical hazards, radiological hazards, or mechanical irritants encountered in a manner capable of causing injury or impairment in the function of any part of the body through absorption, inhalation or physical contact.
There is nothing measurable here. They do call out ASTM C 1055-92, which I consider below.
ASTM International
ASTM C1055 has a table that describes how surface temperature affects skin.

Figure 2: Surface Temperature and Skin Sensation.
I found a web page that paraphrases the ASTM approach as follows:
ASTM C1055 (Standard Guide for Heated System Surface Conditions that Produce Contact Burn Injuries) recommends that pipe surface temperatures remain at or below 140°F. The reason for this is that the average person can touch a 140°F surface for up to five seconds without sustaining irreversible burn damage.
ASTM C1055 determined that five seconds is the most probable contact time in an industrial setting. In high ambient temperature environments or where there is an elevated risk to the worker, many process engineers will use 120°F as the maximum safe-to-touch temperature to further reduce the risk to workers.
These standards are measurable and reasonable, but focused more on an industrial setting where you have trained people.
Telcordia
Telcordia GR-63 is the "gold standard" for telecommunications requirements. Figure 3 show their approach, which I prefer because it distinguishes between materials and contact time.

Figure 3: Telcordia Surface Temperature Limits.
An excellent industrial standard, but I am a bit concerned about applying it to non-industrial applications.
NASA
I generally find NASA's work definitive. They have an excellent paper that goes into the tradeoffs, and this paper contains Figure 4, which models "hot to touch" limits. The x-axis represents the surface thermal characteristics, with aluminum being shown by the point on the left-hand side. They define infinite time as 600 seconds.

Figure 4: NASA Hot To Touch Chart.
The paper also states that
Given that the data on pain converge around the same value, the 44°C (111.2°F) epidermal/dermal interface temperature derived by Hatton and Halfdanarson from Stoll et al.'s data should be used as the upper limit for contact with hot objects.
This is a measurable standard for surface temperature limits. It basically is the same temperature as hot bathwater.
Conclusion
I like the NASA standards for surface temperature limits, and I will recommend following their lead. It actually is the most conservative of all the recommendations I found.

![\sqrt[5]{100}](https://s0.wp.com/latex.php?latex=%5Csqrt%5B5%5D%7B100%7D&bg=ffffff&fg=000&s=-1&c=20201002) or about 2.512.(
or about 2.512.(![\displaystyle {{m}_{{\text{star}}}}={{m}_{\odot }}-2.5{{\log }_{{10}}}\left[ {\frac{{{{L}_{{\text{star}}}}}}{{{{L}_{\odot }}}}{{{\left( {\frac{{{{d}_{\odot }}}}{{{{d}_{{\text{star}}}}}}} \right)}}^{2}}} \right]](https://s0.wp.com/latex.php?latex=%5Cdisplaystyle+%7B%7Bm%7D_%7B%7B%5Ctext%7Bstar%7D%7D%7D%7D%3D%7B%7Bm%7D_%7B%5Codot+%7D%7D-2.5%7B%7B%5Clog+%7D_%7B%7B10%7D%7D%7D%5Cleft%5B+%7B%5Cfrac%7B%7B%7B%7BL%7D_%7B%7B%5Ctext%7Bstar%7D%7D%7D%7D%7D%7D%7B%7B%7B%7BL%7D_%7B%5Codot+%7D%7D%7D%7D%7B%7B%7B%5Cleft%28+%7B%5Cfrac%7B%7B%7B%7Bd%7D_%7B%5Codot+%7D%7D%7D%7D%7B%7B%7B%7Bd%7D_%7B%7B%5Ctext%7Bstar%7D%7D%7D%7D%7D%7D%7D+%5Cright%29%7D%7D%5E%7B2%7D%7D%7D+%5Cright%5D&bg=ffffff&fg=000&s=2&c=20201002)


![\displaystyle {{C}_{C}}=\Delta {{P}_{{ONU}}}+{{d}_{{Max}}}+10\cdot \left[ {2\cdot {{{10}}^{{-\frac{{{{I}_{A}}}}{{10}}}}}+\left( {N-3} \right)\cdot {{{10}}^{{-\frac{{{{I}_{{NA}}}}}{{10}}}}}} \right]](https://s0.wp.com/latex.php?latex=%5Cdisplaystyle+%7B%7BC%7D_%7BC%7D%7D%3D%5CDelta+%7B%7BP%7D_%7B%7BONU%7D%7D%7D%2B%7B%7Bd%7D_%7B%7BMax%7D%7D%7D%2B10%5Ccdot+%5Cleft%5B+%7B2%5Ccdot+%7B%7B%7B10%7D%7D%5E%7B%7B-%5Cfrac%7B%7B%7B%7BI%7D_%7BA%7D%7D%7D%7D%7B%7B10%7D%7D%7D%7D%7D%2B%5Cleft%28+%7BN-3%7D+%5Cright%29%5Ccdot+%7B%7B%7B10%7D%7D%5E%7B%7B-%5Cfrac%7B%7B%7B%7BI%7D_%7B%7BNA%7D%7D%7D%7D%7D%7B%7B10%7D%7D%7D%7D%7D%7D+%5Cright%5D&bg=ffffff&fg=000&s=1&c=20201002)
![\displaystyle P{{P}_{C}}=-5\cdot \left[ {1-\frac{{{{{10}}^{{\frac{{2\cdot {{C}_{c}}}}{{10}}}}}}}{{N-1}}\cdot {{Q}^{2}}\cdot {{{\left( {\frac{{ER+1}}{{ER-1}}} \right)}}^{2}}} \right]](https://s0.wp.com/latex.php?latex=%5Cdisplaystyle+P%7B%7BP%7D_%7BC%7D%7D%3D-5%5Ccdot+%5Cleft%5B+%7B1-%5Cfrac%7B%7B%7B%7B%7B10%7D%7D%5E%7B%7B%5Cfrac%7B%7B2%5Ccdot+%7B%7BC%7D_%7Bc%7D%7D%7D%7D%7B%7B10%7D%7D%7D%7D%7D%7D%7D%7B%7BN-1%7D%7D%5Ccdot+%7B%7BQ%7D%5E%7B2%7D%7D%5Ccdot+%7B%7B%7B%5Cleft%28+%7B%5Cfrac%7B%7BER%2B1%7D%7D%7B%7BER-1%7D%7D%7D+%5Cright%29%7D%7D%5E%7B2%7D%7D%7D+%5Cright%5D&bg=ffffff&fg=000&s=1&c=20201002)


![{{x}_{i}}={{\left( {\sqrt[N]{{10}}} \right)}^{i}}](https://s0.wp.com/latex.php?latex=%7B%7Bx%7D_%7Bi%7D%7D%3D%7B%7B%5Cleft%28+%7B%5Csqrt%5BN%5D%7B%7B10%7D%7D%7D+%5Cright%29%7D%5E%7Bi%7D%7D&bg=ffffff&fg=000&s=0&c=20201002)


