My Personal PCB Design and Build Process

Quote of the Day

We buy things we don't need with money we don't have to impress people we don't like.

— Dave Ramsey. I know people with this approach to money.


Figure 1: My Personal PCB Development Process.

Figure 1: My Personal PCB Development Process.

I have been designing circuits since I was a boy, and my passion for circuits has only grown over time. My home designs focus on sensor interfaces that I hook up to the Internet using Raspberry Pie and Arduino digital interfaces. These open-source HW interfaces make it possible to create incredibly powerful designs at home.

While I love designing and testing circuits, I really do not like wiring up prototypes. Fortunately, we are in the Golden Age of Printed Circuit Board (PCB) design and fabrication for the hobbyist. I now simply upload my designs to vendors like OSP Park or Hackvana and completely avoid the pain of  manual wiring. In fact, I just got back three circuit boards from OSP Park (Figure 2 shows an one assembled PCB), and I am in the middle of debugging them now. This post was motivated by people asking me about how I turn my designs into PCBs.

Figure 1 shows you my personal PCB development process. Since my designs are heavily focused on analog sensor interfaces, I spend quite a bit of time modeling using Mathcad and LTSpice. The rest of the work is done using Kicad and Excel.

The process has worked well. The only process improvements I have planned are related to my managing my part databases (CAD and qualified part lists). I have had some issues with ensuring that my schematic symbols and PCB footprints are correct. I need to develop some tools and a process flow that help me ensure that I only use parts for which I have validated the schematic symbols and PCB footprints.

Figure 2: My Recent OSP Park Purchase (note the purple solder mask).

Figure 2: My Recent OSP Park Purchase. Note the purple solder mask – usually I buy green or red.

Posted in Electronics | Comments Off on My Personal PCB Design and Build Process

Dealing with Climate Change Denial

Quote of the Day

Her favorite position was beside herself, and her favorite sport was jumping to conclusions.

— Danny Kaye, describing a woman he knew. I often meet people like this – they wear me out.


Figure 1: Plot of Global Sea Level Since 1900 (Source).

Figure 1: Plot of Global Sea Level Since 1900 (Source).

I have lunch with all sorts of people. Occasionally, I end up sitting with a climate change denier, which happened today. Usually, I do not say anything because I really do not want an argument.

Today, I decided to mention Figure 1, which summarizes a set of measurements made since 1900 that show that sea level is rising. I then asked the climate change denier if they can explain the fact that sea level is rising –a  fact has been confirmed by multiple measurements taken at multiple sites over more than 100 years.

Some people try to dispute the measurement and say it cannot be correct. I simply tell them that the data has been consistent between the numerous groups that perform the measurement, and this should minimize the possibility of systematic and random errors. I often mention that we have excellent evidence that there is a massive amount of glacial melt water entering the oceans (see this post) and that this water is one cause of the sea level rise.

Today, the climate denier decided not to refute the sea level data and changed his argument by saying that the climate may be changing, but no one can prove that it is because of human-related causes. The denier attributed the rise in atmospheric CO2 levels to natural events like volcanic eruptions. I then pointed out we have isotopic measurements that show that the CO2 rise is because of burning fossil fuels (see this post) and cannot be from geological causes. This fact bothered him – I do not think I will need to listen to any more climate denial at lunch.

I have to say that Minnesota's climate does seem different than when I was a boy – the outdoor hockey season is clearly shorter.

Posted in General Science | 1 Comment

Withdrawal Force Rating for Various Nails

Quote of the Day

No plan for software development survives contact with the code – double so for legacy code.

— Comment from a software developer. This is a modification of Helmuth von Moltke’s "No plan survives contact with the enemy."


Introduction

Figure 1: Withdrawal Force Rating for Various Nails and Wood Species (Source).

Figure 1: Withdrawal Force Rating for Various Nails and Wood Species (Source).

I have been reading some specifications on fastener requirements in carpentry. To ensure that I understand what I am reading, I decided to see if I could duplicate the design values for nailed connections. In this post, I will duplicate a table (Figure 1) for the withdrawal force ratings of various nails when used in a toe-nailed connection. In general, I try to avoid nails with a withdrawal load, but it is an allowed connection and it was easy to duplicate the results in a National Design Specification (NDS) document. I will be performing a similar computation for the lateral load rating in a later post. My Mathcad source and a PDF are stored here.

I do want to mention that I find the NDS documents to be models of technical exposition. Nice job folks!

Disclaimer: I am NOT a structural engineer. I am just a guy who finds the subject interesting. If you have structural questions, contact a structural engineer.

Background

Toe-Nailed Connection Geometry

Figure 2 shows how the withdrawal and lateral forces on a toe-nailed joint are defined. It also defines the terms that are critical to a toe-nailed joints strength.

Figure M: Geometry of a Toe-Nailed Connection (Source).

Figure 2: Geometry of a Toe-Nailed Connection (Source).

Formula for Nail Withdrawal Force

Figure 3 shows the formula used to generate the withdrawal force table values (Source).

Eq. 1 \displaystyle {{F}_{W}}=1380\cdot {{G}^{{\frac{5}{2}}}}\cdot p\cdot d\cdot {{C}_{{tn}}}

where

  • G is the specific gravity of the wood (unitless).
  • p is the penetration depth into the cross-member (in).
  • d is the diameter of the nail (in).
  • FW is the withdrawal force rating of the nail (lbf).
  • Ctn is the withdrawal force reduction due to this being a toe-nailed connection (unitless).

Analysis

Solution

Since I am just evaluating a formula at various points, there is not much analysis involved. The solution mainly involves getting all the variables setup properly, which I show in Figure 3.

Figure 3: Calculation Setup and Solution.

Figure 3: Calculation Setup and Solution.

Toe-nailed Connection Specification

Presentation

I generally do not use Mathcad to present tables of data – Mathcad's formatting capabilities are too limited. However, you can use an Excel component within Mathcad, which allows you to use the all of Excel's rich formatting features. Figure 4 shows how I put together a table using Mathcad and an Excel component that looks very similar to the NDS table shown in Figure 1.

Figure 4: Excel Used to Present the Data.

Figure 4: Excel Used to Present the Data.

Conclusion

I think I understand where the withdrawal force rating table came from. It is simple in that there is only one formula to evaluate. In the case of the lateral force rating, there are multiple formulas to evaluate. That will be a topic for a later post.

Save

Save

Save

Posted in Construction | 3 Comments

Lightning-Induced Surge on Cable Wiring

Quote of the Day

People seldom improve when they have no other model but themselves to copy.

- Oliver Goldsmith, writer. I love to read biographies. I often look to these biographies for inspiration on how to approach my work and home life.


Figure 1: My Favorite Lightning Photo. Notice
the lightning jumping from the hub cap to the
ground. Even the insulation of the tires did not
stop the bolt from reaching ground. (Quora)

Because I have had to deal with lightning in all sorts of contexts (e.g. military equipment, commercial hardware, consumer products), I have developed an enormous respect for the power of lightning (Figure 1). Because of this respect, I have worked to ensure that my own home has excellent lightning protection, including a sophisticated ground system.

However, even with all my precautions, last weekend lightning struck near my home and caused my garage door to open – letting rain into the garage, and my garage door opener to become unresponsive. Fortunately, I just had to cycle power again on the garage door opener and it started to work. If it were not for that, I might have had to click here and find a quality garage door installation and repair service, to bring the garage door to how it was. Well, I guess, I was lucky, at least for this time. But yes, the place seems to be drenched and needs cleaning!

Unlike me, if you find yourself in such a difficult situation, you could then consider opting for the services of ADP Garage Door Repair of Westminster, MD. (if you happen to live there or nearby!)

This week, a friend sent me these photographs from a fire investigator who was preparing a report on a lightning surge on a home's cable TV wiring. I thought some of you may find these photos interesting. If you are looking for more information on lightning protection, see this post.

In Figure 1, you see where the cable passed through some joists that had fiberglass batt insulation between them. During the lightning strike, the cable became very hot.

Figure 1: Region of Ceiling Where Cable was Run.

Figure 1: Region of Ceiling Where Cable was Run.

In Figure 2, you can see the soot rising above the cable penetration through the joist.

Figure 2: Close up of Joist With Coaxial Cable Running Through It.

Figure 2: Close up of Joist With Coaxial Cable Running Through It.

In Figure 3, you can see more soot on the fiberglass batts.

Figure 3: Soot on Fiberglass Batts.

Figure 3: Soot on Fiberglass Batts. You can see why it is important to consider the flammability of building materials, like insulation.

Posted in Electronics | Comments Off on Lightning-Induced Surge on Cable Wiring

Molarity, Molality, Mass Fraction Conversion Formula

Quote of the Day

A leader is best when people barely know that he exists. ... When his work is done, his aims fulfilled, they will all say, 'We did this ourselves.'

Lao Tzu, ancient philosopher. My best managers have taken Lao's approach. The first management advice I received was similar in spirit: (1) keep a low profile, and (2) always take less than my share of the credit and more than my share of the blame. This advice has served me well.


Introduction

Figure 1: Graphical Model of Concentration Formula

Figure 1: Graphical Model of Concentration Formula

I am doing some work with lead-acid batteries and their state of charge versus their H2SO4 electrolyte concentrations. While we normally use specific gravity to assess a battery's state of charge, some folks use molality (m), molarity (M), or mass fraction (w). These concentration metrics are all related by relatively simple formulas (Figure 1).

In this post, I will review the formulas used to convert between the different electrolyte metrics. As part of my review, I will illustrate how to use the formula by recreating a table of combined H2SO4 electrolyte metrics.

My Mathcad source and its PDF here. These calculations depend on specific gravity, which I always treat as equivalent to density with units of mass/volume. Technically, specific gravity is unitless.

Background

Definitions

I refer you to this post where I had previously defined molarity, molality, and mass fraction.

Reference Table

Figure 2 shows a screen capture of a table of H2SO4 concentrations that I used to test my formulas. For molarity and molality, I only used the 25 °C values. I grabbed this table from Google Books, used ABBY FineReader to OCR it, and tossed the data into Mathcad.

Figure 2: Table of H2SO4 Concentration Metrics.

Figure 2: Table of H2SO4 Concentration Metrics (Source).

Analysis

Formula Setup

Figure 3 shows how I setup the calculations. The key conversion formulas are highlighted in green.

Figure 3: Conversion Formulas.

Figure 3: Conversion Formulas.

Cross-Check

Figure 4 shows where I used the formulas to calculate the various concentration metrics and compared my results with the values from Figure 2. I used the formulas of Figure 3 to show that I can compute

  • Molality ⇨ Mass Fraction
  • Mass Fraction and Density ⇨ Molarity
  • Molarity and Density ⇨ Molality

The agreement between the calculations and the empirical results (Figure 2) is excellent.

Figure 4: Comparison with Empirical Results.

Figure 4: Comparison with Empirical Results.

Conclusion

This was just a quick calculation to verify that I had my conversion formulas were coded correctly.

Appendix A: Random Worked Examples.

Here is an example I found in many textbooks (here is an example).

Figure M: Text Book Example 1.

Figure 5: Text Book Example 1.

Here is are two examples I found in this test solution.

Figure 6: Textbook Example 2.

Figure 6: Textbook Exam Solution 1.

Figure 7: Exam Solution Example 2.

Figure 7: Exam Solution Example 2.

Posted in Batteries | 1 Comment

Volume Reduction in Ethanol-Water Mixtures

Quote of the Day

The greater the artist, the greater the doubt. Perfect confidence is granted to the less talented as a consolation prize.

— Robert Hughes, art critic. This is a restatement of the Dunning-Kruger effect. I see this effect all the time with engineers and physicists – the best of them are full of doubt and the worst are cocksure.


Introduction

Figure 1: Excess Volume Vs Mole Fraction of Ethanol-Water Mixture (Source).

Figure 1: Excess Volume Vs Mole Fraction of
Ethanol-Water Mixture (Source).

I recently toured a winery and, during the tour, I saw a number of charts related to various properties of ethanol and water mixtures. I was a bit puzzled when I saw Figure 1, which is a chart that I had never seen before. Figure 1 shows the amount of volume reduction experienced by an ethanol-water mixture compared to the separate volumes of the water and ethanol. I became curious about the chart and decided to see if I could derive these results on my own.

This was a good exercise in basic mixtures and provided me some insight into what happens when you mix liquids. I was able to derive almost exactly the same chart using some data from the Wikipedia.

My Mathcad source and a PDF version are included here. One interesting aspect of this solution is that I demonstrate how to pass a function to a Mathcad program.

Background

Why a Volume Reduction?

You can view the net volume reduction in a number of ways. The best explanations I have seen for describing this effect were in this Quora discussion. The following quote from that discussion provides a simple, intuitive way of viewing what is happening (Source).

Water has a relatively loose structure because the multiple hydrogen bonds keep the molecules apart. This creates a lot of empty space between the molecules (see BIOdotEDU).

When mixed with other substances, this loose structure of liquid water is disrupted, and the empty space becomes less.

For more information on this topic, see the Wikipedia discussion on ideal solutions.

Modeling Overview

The calculation is actually quite simple and is performed in three phases:

  • compute the volume of ethanol and water as separate liquids
  • compute the volume of the mixture of ethanol and water
  • compute the difference between the two volumes per mole

Analysis

Gather Ethanol-Water Mixture Density vs Mass Fraction Data

All the data needed to recreate Figure 1 is present in a table of specific gravity versus mass ratios for ethanol-water mixtures. There are numerous places to find this data – I used the Wikipedia's ethanol data page. You need to make sure that you grab the data for the correct mixture temperature – in my case, 25 °C ethanol and 25 °C water.

Figure 2: Ethanol-Water Mixture Density Data from Wikipedia.

Figure 2: Ethanol-Water Mixture Density Data from Wikipedia.

Wikipedia Ethanol-Water Mixture Data

Convert Mass Fraction to Mole Fraction

Figure 3 shows how I converted the mass fraction to a mole fraction. As you might expect, the conversion factor is the molar mass.

Figure 3: Mass Fraction to Mole Fraction Conversion.

Figure 3: Mass Fraction to Mole Fraction Conversion.

Grab Reference Data and Curve Interpolation

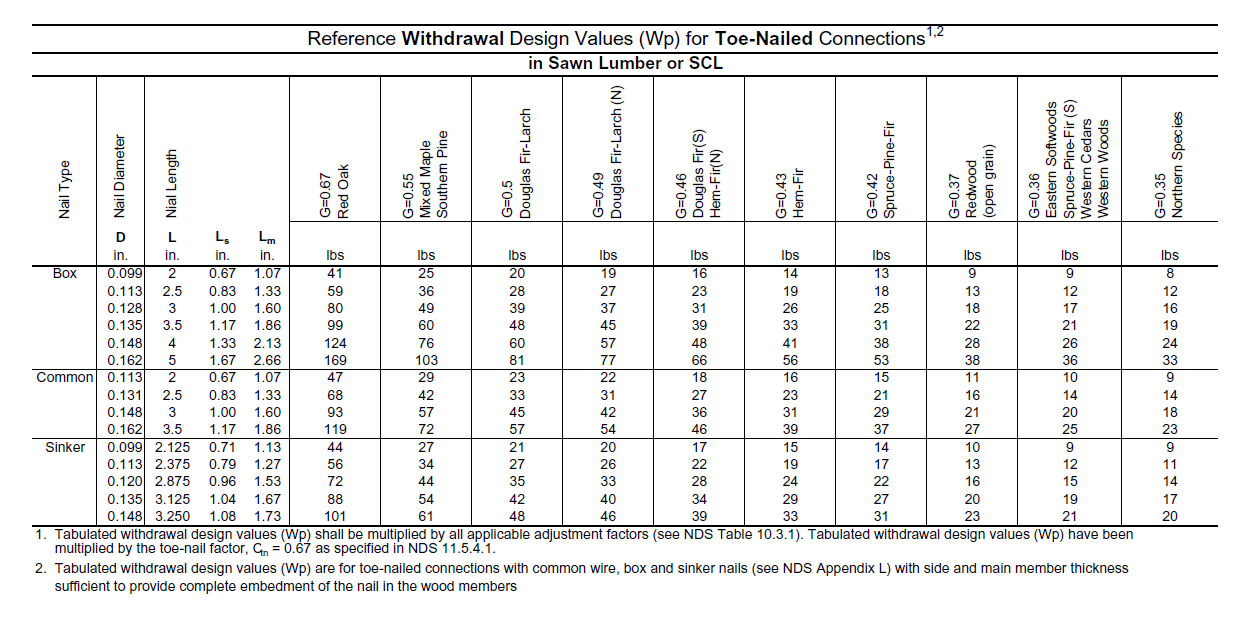
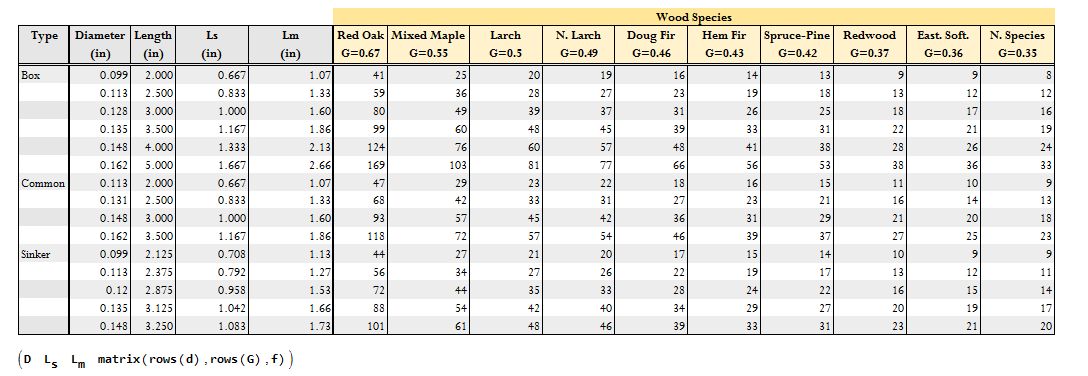
Figure 5 shows my reference data, which is also plotted in Figure 1. I was impressed with the amount of chemical data on the Dortmund Data Bank web site.

Figure 5: Obtain Reference Curve and Interpolate Discrete Data.

Figure 5: Obtain Reference Curve and Interpolate Discrete Data.

Published Excess Volume Data

Grab Reference Data and Curve Interpolation

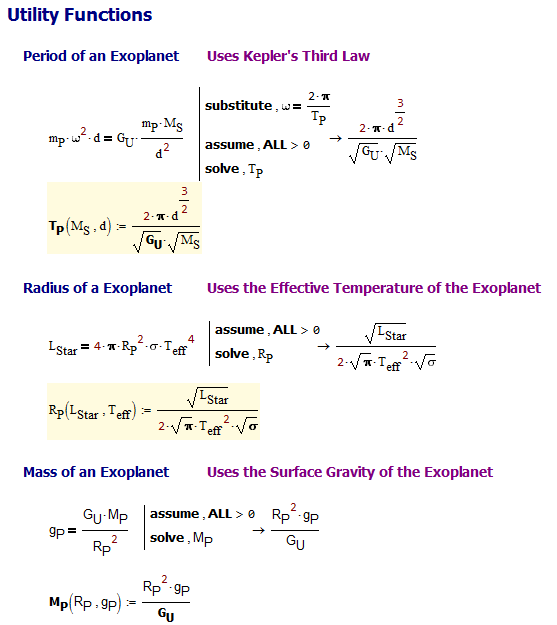
Figure 6 shows how I computed the excess volume per mole:

  • the volume of ethanol and water as separate liquids
  • the volume of the mixture of ethanol and water
  • the difference between the two volumes per mole

I then graphed this calculation as a function of the mass mix ratio. I should mention that the excess volume per mole is negative because the volume of ethanol and water mixtures is less than the sum of the individual volumes.

Figure 6: Generate Excess Volume Metric and Graph.

Figure 6: Generate Excess Volume Metric and Graph.

Conclusion

My results are very close to the published result and the differences are probably due to differences in the original ethanol-water mixture data. When I started hunting for data online, I saw that there was some variability between the different ethanol-water mixture data sets, which you would expect since it is empirical data.

Posted in General Science | 3 Comments

Winery Tour – Domaine Carneros

Quote of the Day

Don’t cling to a mistake just because you spent a lot of time making it.

— Author unknown. I have many quotes that discuss the problems with making decisions based on sunk costs.


Introduction

Figure 1: Guest Parking at the Domaine Carneros Winery.

Figure 1: Photo of the Domaine Carneros Winery from Parking Lot A.

I attended a management meeting at the Domaine Carneros winery in Napa, CA this week. I must say I was impressed with this facility – this is as beautiful as I have seen. Our meeting lasted until 4:00PM and then we went on a 90 minute winery tour.

I like to collect vineyard trivia while on these tours and this trip was no exception. Since I do not drink, my interests tend to focus on the farming aspects of the operations. I have discussed winery trivia before in this post. All photos in this post were taken by me.

Trivia

  • The Domaine Carneros winery focuses on producing sparkling wines.
  • Their wine club is the largest (11,000+ members) in the Napa Valley.
  • The wine blend for restaurants is different than sold at the winery. For example:
    • They want a more aromatic grape blend when combined with food. The mixture is 58 % Pinot and 42% Chardonnay.
    • The winery blend is 42% Pinot and 58 % Chardonnay.
  • The vine life is normally ~19 years, but the vineyards in the valley have been fighting  a disease that has reduced the vine life to ~8 years.
  • There are ~1150 vines per acre.
  • The vine yield is quite variable and is usually in the 1 to 3 ton per acre range.
  • This means a single vine produces 2 to 3 pounds of grapes.
  • The vines are watered using a very sophisticated watering system. They work to stress the vines so they produce the best grapes for wine, which means the vines are watered infrequently. For example, so far this year the vines were watered once in April and twice in June – 2 gallons each time.
  • Our winery guide mentioned that winds flowing through the Petaluma Gap keep the vineyards cool.

More Photos

Figure 2: Vineyard Courtyard Area (Source: Me).

Figure 2: Vineyard Courtyard Area.

Figure 3: Photograph of the Grape Fields (Source: Me).

Figure 3: Photograph of the Grape Fields.

Figure 4: Another Picture of Vines (Source: Me).

Figure 4: Another Picture of Vines.

Figure 5: Outdoor Dining Area.

Figure 5: Outdoor Dining Area.

Figure 6: Map of the Vineyard Area.

Figure 6: Map of the Vineyard Area.

Posted in Farming | 2 Comments

3D Plot Example Using PCB Trace Current vs Trace Area and Temperature Rise

Quote of the Day

Reproducibility, automation,  it's just text, and easy to communicate.

— Hadley Wickham, virtuoso in data visualization, on why we should use a programming language for data analysis.


Introduction

Figure 1: Example of a Mathcad 3D Plot.

Figure 1: Example of a Mathcad 3D Plot.

I was asked this morning about how to create a 3D plot in Mathcad that shows a surface, two lines on the surface, and marks the point of intersection of the two lines (Figure 1). It just so happens that I have been looking at the amount of current that a PCB trace of a given area can carry for a given temperature rise above ambient – I will use this function for my 3D plot example. While the curve itself is a bit boring and viewing it in 3D does not add any value, this example does illustrate the procedure for generating this type of plot.

For those who are interested, my Mathcad source is here.

Background

The equation that I am plotting comes from this document on outer layer trace current (IOuter) versus versus trace area (A) and allowed temperature rise (ΔT).

Analysis

Setup the Formula

The commonly used formulas for the current carried by a PCB trace with a given cross-sectional area and temperature rise are given by the following documents:

  • Document used for these calculations (I have used this for years)
  • An update to the document above that I have not gone through yet
  • The original mil-spec (1970s) on which much PCB thermal work is still based

Figure 2 shows the formula that I usually use and a traditional 2D representation of a 3D data.

Figure 2: Equation Setup and 2D Plot.

Figure 2: Equation Setup and 2D Plot.

Setup the 3D Plot

Figure 3 shows how I setup the 3D plot. In this case, I decided to plot the surface using parametric equations – the only reason I did this was to demonstrate the parametric concept.

Figure 3: How to Setup the 3D Plot.

Figure 3: How to Setup the 3D Plot.

The actual plot is shown in Figure 4, which is the same as Figure 1 but with the graphic arguments shown.

Figure 4: Figure 1 with Graphic Arguments Shown.

Figure 4: Figure 1 with Graphic Arguments Shown.

Conclusion

I hope this helps folks who are struggling with 3D plots in Mathcad. They can be frustrating.

Posted in Electronics | Comments Off on 3D Plot Example Using PCB Trace Current vs Trace Area and Temperature Rise

A Little Analysis of a Visible Exoplanet

Quote of the Day

Everything comes to he who hustles while he waits.

— Thomas Edison


Introduction

a

Figure 1: Image of CVSO30c From The
Very Large Telescope in Chile (Source).

I saw an article in the popular science press about a real rarity – an exoplanet that can be seen (Figure 1). I dug around the web and found the journal article on which most of the press articles were based. Given their measurement data, I wanted to see if I could duplicate some of their computed exoplanet characteristics. In this post, I will be using some of the techniques learned about while listening to The Search for Exoplanets: What Astronomers Know.

Much of the data that astronomers are gathering is obtained using the transit method of exoplanet detection. While this is a powerful technique, it can only be applied to about 0.5% of the star systems we can view – systems that are edge-on to our field of view and where eclipses can occur. While not a general method, the transit method has been used by the Kepler spacecraft to find over 1000 confirmed exoplanets, which is impressive considering that considering that Kepler stares at a fixed set of ~145K stars (i.e. a tiny portion of the sky).

I include a copy of my Mathcad source here.

Background

Reference Material

I have covered exoplanet detection and analysis methods in other posts. Here is a list of my previous posts:

In this post, I will show how the effective temperature of the exoplanet can be used to estimate its radius. One interesting development is that the basic transit method is now being extended to provide some atmospheric measurements. These measurements can be used to estimate the surface gravity of the exoplanet, which in turn can be used to estimate the mass.

For planetary systems that are close to ours, astronomers can use transit and radial velocity methods to cross-check their estimates. This also helps to reduce the effects of systematic errors.

Star/Planet Information Information

The journal article mentioned above provided the following measurements of CVSO30 and CVSO30c.

Figure M: Key Measurements from Transit Observations.

Figure 2: Key Measurements from Transit Observations.

I should point out that some of these measurements are based on spectra (e.g. surface gravity), which requires quite a bit of light to generate. As I mentioned in this post, the amount of light available from even nearby stars dribbles in at a handful of photons per second. This makes these measurements very time consuming.

Analysis

Utility Functions

Figure 3 shows the basic astronomical formulae needed to compute some exoplanet characteristics. Note that I did not include the formula for estimating the distance between the exoplanet and star, \displaystyle {{d}_{{CVSO30c}}}={{\theta }_{{CVSO30c}}}\cdot {{d}_{{CVSO}}}, because it is simple enough that I just recalled it from memory.

Figure 3: Utility Functions.

Figure 3: Utility Functions.

Analysis Setup

Figure 4 shows all the units and constants I used for this analysis. The values all came from the Wikipedia.

Figure 4: Units and Constants.Figure 4: Units and Constants.

Figure 4: Units and Constants.

Solution

At this point, all I need to do is substitute the measurements into the utility functions. Figure 5 shows the results of these calculations. My results are very close to the values in the referenced journal article.

Figure 5: My Results Using the Observational Data.

Figure 5: My Results Using the Observational Data.

Conclusion

This was the first time I had seen that astronomers could measure the surface gravity of an exoplanet and use that value to estimate the exoplanet's mass. The use of the exoplanet's effective temperature is also interesting because it can be used to determine the radius of the exoplanet.

Posted in Astronomy | Comments Off on A Little Analysis of a Visible Exoplanet

Extended Reach PoE Example

Quote of the Day

The great aim of education is not knowledge but action.

— Herbert Spencer


Introduction

Figure 2: A Typical Composite Cable.

Figure 1: A Typical Composite Cable. (Source)

The popularity of Power Over Ethernet (PoE) has proven that customers find value in using a single cable for both data and power distribution. Unfortunately, copper-based Cat 5e/6 cable is limited to a 100 meters because of data transmission issues. To circumvent this limit, some equipment vendors are using composite fiber/copper cables – a single cable that contains fiber for data and large gauge copper wire for power distribution (Figure 1).

Figure 1: Illustration of Belden's Power of LAN (POLAN) Concept.

Figure 2: Illustration of Belden's Power Over LAN (POLAN) Concept.

Some composite cables distribute power using a single pair of 22 AWG wire (power and ground). Other composite cables use Cat 6 cables with four pairs of 23 AWG wire to distribute power. I have also seen some proposal that have completely separate power and data cables.

To develop an intuitive feel for how these proposals work, I decided to work through a simple example from Belden (Figure 2) – the choice of Belden was completely arbitrary. Belden is recommending the use of Cat 6-based composite cables over a 22 AWG-based composite cable.

The analysis is simple and I normally would not post it – it consists of determining the resistance of copper wire at different temperature, gauges, and lengths. I decided to post this analysis because I used Mathcad's minimize function to optimize my model, which I do not recall demonstrating before. This will be an example that I will include in my set of reference worksheets for my staff.

Background

Definitions

American Wire Gauge (AWG)
This is an archaic way of specifying the diameter of wire. Also known as the Brown & Sharpe wire gauge, AWG is a standardized wire gauge system used since 1857 predominantly in North America for the diameters of round, solid, nonferrous, electrically conducting wire. (Source)
Contact Resistance (RC)
The term contact resistance refers to the contribution to the total resistance of a system which can be attributed to the contacting interfaces of electrical leads and connections as opposed to the intrinsic resistance, which is an inherent property, independent of the measurement method. (Source)
Reach
I use the term reach for the maximum useful distance that a cable can service. This assumes a completely straight cable run, which rarely occurs in real life.

Copper Wire Resistance Modeling

See this web page for background on modeling the resistance of copper wire.

Objective

Belden gives the following reaches (Figure 3) for a one-pair 22 AWG cable and a four-pair Category 6 (i.e. 23 AWG) cable in this document.

Figure M: Belden Reach Specifications.

Figure 3: Belden Reach Specifications.

Analysis

Utility Functions

Many of my posts use a pair of utility functions that compute the resistance of annealed copper wire as a function of temperature, wire gauge, length. I have discussed these utility functions (Figure 4) in a previous post – I will include them here for easy reference.

Figure M: Utility Functions.

Figure 4: Utility Functions.

Calculation Setup

Figure 5 shows how I setup my calculations for a commonly used temperature (50 °C). It also shows the Belden table that I will use for comparison with my model.

Figure M: Analysis Setup.

Figure 5: Analysis Setup.

Basic Circuit and Reach Formula Equation

Figure 6 shows the reference circuits and the formula I used to model the voltage drop for a given load current. In Figure 6, I define a parameter called λ that represent the two-way resistance in the cable per meter. This means that the total resistance in the cable is given by 4\cdot {{R}_{C}}+\lambda \cdot reach.

Figure 6: Reference Circuits and Reach Formula.

Figure 6: Reference Circuits and Reach Formula.

Case Modeling

Figure 7 shows the how I modeled:

  • Copper resistivity versus temperature for a 100 m length and specific wire gauges
  • PoE source voltage, load voltage, and load power specifications – these values are set by the type of PoE (i.e. Type 1, Type 2, Type 3 – not codified).
  • Wire configuration using an array called pairs
  • Contact resistance
Figure M: Modeling the Use Cases.

Figure 7: Modeling the Use Cases.

Table Generation

We are now ready to determine the contact resistance values that will minimize the least-square error between my model and the Belden specification (Figure 8). I do not expect perfect agreement because Belden provides no details on their analysis assumptions.

Figure M: Tune the Contact Resistance Values and Generate the Belden Table.

Figure 8: Tune the Contact Resistance Values and Generate the Belden Table.

I consider these values reasonably close considering that I am trying to guess their analysis assumptions.

Conclusion

While simple, this analysis provided a nice example for how to use Mathcad's minimize function.

Save

Save

Posted in Electronics, Power Over Ethernet | Comments Off on Extended Reach PoE Example